Friday, August 14, 2015

Creating Classroom Community... while taking attendance!

Hello readers! Today I want to share one of the things I do in my class to try to develop a classroom community, where the students really get to know one another. There are a million ways to do this, and one of the things I love to do is make calling attendance fun.

Now, after the first few days of school, you probably know all the students’ names, and you don’t really need to “call” roll; rather, you can just look around the room and see who is/isn’t there. I say that’s no fun. So what I do instead is I call roll every morning, and instead of having students raise their hands, say “here” or “present,” I ask the students to answer a question about themselves for me.
The first few days it’s always something simple, like “What is your favorite color?” and “what is your favorite food?” But after a few days, it takes a bit more creativity. Things like “Would you rather be a lion or an elephant?” or “Would you rather be able to turn invisible, or be able to fly?” After a week, my students start shouting out questions they want to answer. It makes taking attendance much more interesting, and it’s one of the little ways I try to get to know my students and help them get to know one another! It’s also great for calling roll as a sub.
Have any of you tried this for calling attendance? Any good recommendations for questions to ask the kiddos? Feel free to leave a comment!

Thursday, July 30, 2015

Classroom Management: 5 Attention Grabbers for Elementary School Students

One of the things I really liked about student teaching and subbing is that I got to see how different classes run.. Every class is at least a little different, even if they use the same clip chart, follow the same rules, and give out the same rewards and punishments. One thing I loved getting to see was all the different call-and-response attention grabbers that different teachers came up with. Here are a few of my favorites.


  • Teacher: Spaghetti! Student: Meatballs!
This is one that my former kindergarten teachers used (and by former kinder teachers, I mean the ones who taught me in kindergarten). I've spent a lot of time in their classrooms over the past few years, and I always loved this one. Since they taught kindergarten, when the students said "Meatballs!" they would put their hands on their heads. I love doing hands on heads with younger students because it's easy to tell who is following directions and who might be goofing off or otherwise off task.

  • Teacher: One two three, eyes on me! Student: One, two, eyes on you!
With this one, the students would also put their hands on their heads, because like I mentioned earlier, little kids + busy hands = good. And of course, they need to actually face their eyes towards you. I always find it funny when the kids say it, but they continue looking off into space.

  • Teacher [to the tune of If you're happy and you know it...]: If you're ready and you know it, clap your hands! Student: *clap clap*
Okay, so this is one I kind of figured out on my own, and I'm a little too proud of myself for it. I found this worked well for substitute teaching especially, because the kids have heard the song so many times, most of them clap without realizing it. It's positively Pavlovian and I love it. The only problem is sometimes the students feel the urge to continue singing it once you've started, so proceed with caution!

  • Teacher: If you can hear me, clap once! Student: *Clap* Teacher:If you can hear me, clap twice! Student: *clap clap*
I like this one because you can start it out really, really softly, so that only a few students can hear you, and yet still, the whole class will quickly hush because they hear the clapping! Also, if you feel so inclined, you could make it almost like a game of Simon Says: if you can hear me, hands on head. If you can hear me, touch your nose. If you can hear me...

  • Call and Response Clapping
Okay, so this one is a little harder to describe, but you've probably heard it. Basically, you the teacher claps the following pattern: Clap Clap Clap-Clap Clap! and the students clap the pattern back to you. (For those of you who are musically inclined, I'm talking a basic four beat quarter quarter eighth eighth quarter.) It should sound like the beginning of a cheer at a football game or something. If your students become immune to this rhythm, I'd suggest changing it up. I have been a drummer for my whole life, so I have a lot of fun creating some simple patterns for my kids to follow. Also, it requires attentive listening, so that's a major bonus.


So, if you're in need of some attention grabbers, go ahead and try these out! And I'd love to have a few more in my teaching arsenal - let me know in the comments below what other attention grabbers you like to use!

Wednesday, July 29, 2015

3 Great Brain Breaks for your Elementary School Classroom


Hello fellow teachers! Today I want to give you some ideas for brain breaks and “sponge activities” - activities we use to “soak up” extra time. I always try to have my plans cover every bit of time to maximize content covered, but sometimes the kids - or the teacher! - get too squirrely, and you need a break! Or, as a sub, I find that I sometimes have a bit of extra time. I like to hold that over my students’ heads as a reward for excellent behavior. Anywho, here are a few of my favorite brain breaks and sponge activities!


  1. Around the World
Time needed: 5-10 minutes
Supplies: Flash cards, BrainQuest questions, or you can just make up questions as you go!
Grade level: Any

Around the World is a pretty simple, whole class activity that gives you a chance to practice facts with your students. I usually use math facts - addition with younger students, multiplication with older students - but you can use whatever problems or questions you want.

Here’s how you play: You have two students stand up at their seats, next to each other. Show/ask the students a problem. The two students who are up will try to come up with the answer quickest. Whichever one calls the correct answer first goes on to the next student. If the traveling student gets the answer wrong, the other student will take his place and the wrong student will take his seat. This keeps going until one student makes it all the way “Around the World” and gets the correct answer against every other student, or until you’re out of time.

2. Silent Ball
Time needed: 10+ Minutes
Supplies: Playground ball
Grade level: Any

Silent Ball is lots of fun. It’s not really educational, but it’s a good way to get the wiggles out and get a bit of quiet. It can be played inside the classroom or outside and all you need is a somewhat soft ball.

Gameplay is simple. If we’re playing inside, I have students sit on top of their desks facing the middle of the room. Outside, I’ll have the students form a circle. Students pass the ball back and forth without it landing on the floor. If the student who throws it makes a bad throw and as a result, the catcher couldn’t catch it, then the thrower is out. If it was a fair throw but the catcher didn’t catch it, then the catcher is out. And, most importantly, if you make ANY noise, you are out. Depending on the class, I find that to be the hardest rule for the students to follow.

If I have plenty of time, I’ll let the students play until the last person gets out and there is only one winner left. I always give that student a prize from my prize box. If I’m shorter on time, I’ll play until there are 5 students left in play. You can make the game a little more complicated by adding more rules. Sometimes I’ll tell the students the ball has to go boy-girl-boy-girl, because it makes them pay more attention. Overall, it’s a fun game, a good reward, and a bonus is it is a quiet activity.

3. Guess Who
Time needed: 5-10 minutes
Supplies: Premade name cards
Grade level: Any

This game is sort of like the games Headbands, Heads Up, or Taboo. It’s easy to alter for any age or grade level, and any subject. I often play this game with characters from a book, but you could also do historical figures, numbers, or really any concept. It’s very easily adapted for different purposes.

Before playing, you will need to do a bit of setup. Grab some index cards and think of a topic. Write down the name of a character (historical figure, number, etc) on each card. For example, if I as making cards for the book Maniac Magee, I would write one name on each card: Jeffrey, Amanda, Mrs. Beale, Bow-Wow, Mars Bar, Russel, Piper, Hands Down. Once you have the cards prepared, you’re ready to play.

Give each student a card, face down so the student can’t see his character. Instruct the students to hold the card up against their forehead, so that the people looking at him can read the card. Give students a few minutes to wander around and help each other guess which character they have. For example, if the student has the “Amanda” card, you would go up and give the student clues like “This character lives in the East End. This character lets Jeffrey borrow a book. This character has a brother named Lester.” After a few minutes, have the students gather around in a circle and ask each one if they figured out their character!

I love this game because it’s fun, quick, and pretty easy to set up, plus it’s curriculum related and can be a way to develop content knowledge in a fun and interesting way. And, as I said, it can be adapted to suit any need. You could give each student a number, and the other students have to use clues like “It is a composite number. It is a multiple of 6.” to guess. Or in social studies. “This person led three ships across the Atlantic Ocean. He was sent by the King and Queen of Spain. He landed in the Caribbean in the year 1492.” And so on. The possibilities are endless!

So these are a few of my favorite sponge activities or brain breaks! What brain breaks do you like to use in your classroom? Feel free to comment below!

Tuesday, July 28, 2015

Teacher Tech Tuesday: Edmodo Snapshots

One of the most popular topics in the modern teacher’s lounge is technology: why do we need it, how can we use it, what are the best programs/websites/tools available to us, etc. And there’s no wonder why. Technology, when used appropriately, can make our jobs so much easier. There are programs for classroom management, websites for skill practice and development, and tools to make engaging presentations. But how do we use it appropriately, and what are the best programs out there? That’s what Teacher Technology Tuesday is for! I plan to write about a different technology tool, website, or program each Tuesday for your perusal. I love trying out new apps or programs or finding new websites, and I want to share those with you. So, here goes!


I want to start with Edmodo, because it has been one of the most valuable websites for me in my teaching career so far. I use it just about daily, and so do my students. It makes communication easier, works as a grade book (although I wouldn’t use it as my primary grade book), and allows you to assess students in a medium more comfortable for most of them.

I created my Edmodo account for my students this past spring mostly for the sake of communication. While I was student teaching, my teacher used it to remind students of what the homework was and remind students what they need to bring the next day. Isn’t that great? But the thing is, although it is great for simple communication, it can do so much more than that.

A few days into my Edmodo exploration, I discovered the Snapshot feature. Basically, a Snapshot is a mini-quiz, multiple choice, that you can assign to your students. Once the students do the quiz, Edmodo gives you that feedback instantly in an easy to view way. I ended up giving 2 or more Snapshots each week, because it’s easy for me to assign and grade, and it gives the students more experience with computer based testing, which is necessary here in California at least, where the SmarterBalanced test is administered completely on the computer.
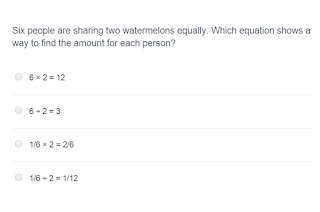
This is an example of a 5th grade math problem on the Edmodo Snapshot. For each standard, they include 4 premade questions. Tip: If I gave out a math snapshot, I would have the students show their work on a separate piece of paper, too.


The data I got from the snapshots over the course of the year was so valuable. I used it to see which standards I needed to go over with the whole class, and it made it easy to design small groups to work with for different skills. Since I began using Edmodo, they have created EdmodoPlus which adds extra features when using snapshots. When I start teaching my own class again, as opposed to subbing, you bet I’m going to pay that $9.99/month for EdmodoPlus. i really love Edmodo for so many reasons, and if you teach at the 3rd grade level or higher, I definitely recommend you use it in your classroom!

So... Here's how to do it!

1. Find the Snapshot icon on the right hand side of the screen. It looks sort of like a magnifying glass with a check mark inside. Click it!
2. Click "Create New Snapshot" Simple enough, no?

3. Select the class, grade level, and standard you want the snapshot to cover. They have English, Math, and Writing for now, but I hear that they're working on more! You can do skills from grade 3 through 12, and you can have it cover as many standards you want. The Snapshot will include 4 questions for each standard you choose.


4. Assign it! If you have the technology available at school, you could have students do this in class as a pretest or a formative assessment. I often gave these out for homework.

5. Check the results! As I mentioned about, I think the data you can gather from this is very valuable. You can look at it by student, to see how one student is doing with each standard, or you can look at it by standard, to see how each student is doing with that standard! Super useful! Of course, upgrading to EdmodoPlus will give you a few extra options as well.
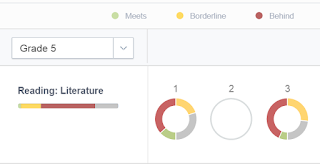
This shows the whole class view of three standards (one of which we did not cover). This shows how the whole class is doing on an individual standard.


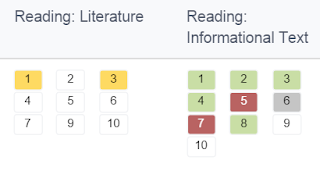
This is the view of one student's data. This student needs a little extra support with RL 5.1 and 5.3, needs a lot of extra support with RI 5.5 and 5.7, but she is doing well in RI 5.1, 5.2, 5.3, 5.4, and 5.8.


Monday, July 27, 2015

Subbing 101: 10 Essentials to Keep in Your Substitute Teacher Bag

subbing 101

One of the things I’ve learned a lot about through trial and error is what things I need to bring with me on the job. Ideally, everything you’ll need to teach will be there in the classroom, and you won’t need to take out any of your supplies. That said, making sure you have these 10 things on hand will be a huge time saver.
10 Essentials to keep in your sub bag. I always have my prize box, tons of stickers, post its, and whiteboard markers, just in case!


  1. Writing tools - both for you and for the students. I always keep a pen and a pack of pencils in my bag. I always want to have a pen on hand for when I write my sub notes. I also keep pencils because sometimes the teachers don’t have extras for their students, or they have them hidden somewhere. It’s easier for me to just reach into my bag and give out one of my own pencils rather than wasting 5 minutes of instructional time to do so. It’s also really smart to have whiteboard markers in your bag - same thing as the pencils. The teacher probably has them, but it’s not worth losing the students’ attention to search them out if they aren’t in an obvious place. Keep a few Expos in your bag, just in case.
  2. Paper for writing sub notes. Usually this is something you can find around the classroom, but it’s so much easier to just have this on hand. I always have either a binder with lined paper or a notebook for this purpose.
  3. My Planner always comes in handy. When you’re good at what you do, other teachers will notice. Sometimes they know they’ll be out sometime soon, whether it’s for a family thing, professional development, whatever. It’s good to have your planner on hand in case the teacher next door asks “Are you free on the 21st? I need someone to cover my class!” Like Scar from The Lion King, I’m going to tell you - Be prepared!
  4. Post its. Okay, I admit, I think I have a post it problem. When I collect papers throughout the day, I put post it notes on them to let the teacher know what it is. Yeah, the teacher probably already knows what it is without the post it. The post it notes are just as much for my sake as for the teacher’s. It’s an easier way to organize what papers you collected and from whom - sometimes even at an elementary level, you’ll be subbing for different classes, and it’s easy to collect a stack of papers from Room 27 and get them mixed up with Room 31’s papers. Post its save my life all the time.
  5. A book for myself. I love to read, and while usually all my free time during a day of subbing is taken up by re-re-rereading the sub plans or organizing something, sometimes you’ll have time to kill at lunch. I always bring along a teacher book. I’m currently reading through Teach Like a Champion 2.0 for the 40th time. It’s just such a great book!
  6. Band-Aids. When a kid comes up to you crying because they have a cut on their hand/knee/finger/wherever, it’s so much easier to deal with when you know where the band-aids are and don’t have to frantically search every nook and cranny. Trust me on this.
  7. Sponge activities of some sort. Okay, so this doesn’t necessarily have to be something tangible, but I personally like to bring in flashcards in addition to having a handful of activity ideas in the back of my head. With flash cards, if we have an extra 5-10 minutes, I can pull out the flashcards and play Around the World. Super handy, I highly recommend it.
  8. Stickers may seem a little juvenile, but if you’re subbing in elementary school, then your students probably love stickers. Yes, even the older kids. I had a college professor who would put stickers on our finished papers before handing them back, and it always made my day. I firmly believe that you are never too old for stickers, and in my experience, my students agree. A lot of times, especially with younger students, I’ll cut down a piece of paper to be about 2 in x 4 in, and bring in a pad or two of stickers. Each student gets a slip of paper and keeps it on his/her desk. While they work, I’ll come around and stick on a sticker if I catch them on task.
  9. Raffle tickets and prize box. Yeah, I’m one of those teachers. I bribe students using a prize box. It works. I actually don’t usually use proper raffle tickets. Instead, I cut up colored card stock and pass out a slip when the students are on task. I’ll draw a few raffle tickets at a time throughout the day - before recess, before lunch, between activities, etc. My prize box has nothing extravagant - pencils, erasers, and bookmarks, primarily. I’m cheap. Like I said, it works.
  10. Business cards. Subbing, like any profession, is really about selling yourself. The thing about subbing, though, is that each day you’ll be at a different place, working for a different teacher. It’s like a new job interview every day, in some ways. Self marketing is so important for success as a sub. Bring those business cards, and share them gratuitously. I always leave a few with my sub notes at the end of the day. Some secretaries hold on to a stack of sub cards just in case also. And make sure to check out the teacher’s lounge - lots of schools have somewhere to write down your sub info/leave a business card.

I find that these are the things I can’t leave home without when I go for a subbing job. This list was created through trial and error - I have needed each of these things at one point, and I would regret it if I didn’t have them with me.

So what do you think? What do you always make sure to bring on the job? Let me know in the comments!

Friday, July 24, 2015

Subbing 101: How to be an A+ Sub!

Subbing 101

Whether this is your first day subbing or you’re just looking for some tips to make it go more smoothly, this is what it takes to be an amazing sub. It seems simple, but seriously, do these things and you’ll stand out! In a good way!
How to be a great substitute teacher

1. Arrive on time.
And by “on time,” what I really mean is arrive early. If school starts at 8:00 and I’m required to be there by 7:45, I will try to get there by 7:30, especially if it’s a school I’ve never been to. The perks of arriving early are endless, and I could write pages on pages of why you should arrive early. But I’ll spare you. Basically, you want to arrive early so you can check in, find your classroom, read the sub plans, and it gives you time in case there are any issues like missing supplies (or worse - no sub plans!).

2. Stick with the plans!
Seriously. It seems obvious, but you’ll be surprised by how many subs don’t follow the sub plans. Teachers write these things for a reason! Stick with the sub plans and you’re doing a great job. Don’t fret if you don’t get to everything that’s written down, but try to do what you can. Also, let the teacher know what you did and didn’t get to in the note you leave, which we’ll get to in a minute.

3. Have the students clean up!
Okay, this one isn’t really required exactly, but it is such a nice gesture. Kids are always a little extra crazy (just a little...) when a sub is around, and as a result, teachers often end up coming back the next morning to a disaster zone. Try not to be one of those subs. If the sub notes say to have the students pack up to go home at 2:15, stop teaching at 2:10 (or 2:00 for younger grades) and have the students clean up their floor area. Give out raffle tickets or prizes to the table/student with the cleanest floor as extra motivation. Have the kids clean up and you will win some serious brownie points.

4. Leave a detailed note.
Leave the teacher a note letting them know how things went. Your note should include
  • What did you cover today
  • What did you not get to (and maybe a little note why)
  • Which students were extra helpful
  • Which students caused a lot of trouble
  • Your contact info
I usually make my notes about a page long. Longer than that and I start rambling. I am really good at rambling. Teachers don’t care about your rambling. So don’t ramble! The teacher needs to know what you were able to teach today, what assignments you got to, and any major behavior issues. It’s also great to hear which students were really helpful - first of all, it makes your whole note seem more positive, and when the teacher gets to praise the students who did an amazing job, it’s extra motivation for all kids to behave a little better next time a sub comes around.

I also always write my contact info and include a business card or two. A little “If you have any questions please feel free to contact me!” goes a long way. I rarely have teachers call me to ask, but it’s nice to add just in case. Also, I try to leave more than one business card, because if teachers like you, they very well might share you with others. I’ve gotten phone calls months after a job asking me if I was available, calls from teachers I’d never met and schools I’ve never been to. Word of mouth can be really effective. Make sure that you’re selling yourself.


So those are my basic tips! Do these four simple things and you’re honestly doing better than most other subs out there. Subbing can be challenging, but from a teacher’s perspective, having to call in a sub can be really, really stressful. This tips will help you and the teacher out. A lot.


Thursday, July 23, 2015

Subbing 101: How to Get Started Substitute Teaching

Substitute Teaching 101


Hey all! Today I want to talk to you about getting started substitute teaching. Different schools/districts have different requirements and processes to go through, but this is what I have to share based on my experience. Your mileage may vary!
How to get started as a Substitute Teacher


First thing's first: find the district you want to work in and scope their website, usually in an EMPLOYMENT or HUMAN RESOURCES section, for info about becoming a substitute there. Admittedly, not all district's sites are super user friendly, but this is probably where you should check first. Here they should have either a link to an application, an outside website such as EdJoin, or a person to contact for more information. Once you get there, you'll be able to find out what the requirements are.
Substitute Teaching Requirements for LAUSD
These are the subbing requirements for the Los Angeles Unified School District, 2nd largest school district in the nation.
In my area, all the schools require that you have a Bachelor's degree of some sort. This may vary state to state, but that has been universally true at all the districts I have checked here in California. Your bachelor's degree doesn't necessarily have to have anything to do with teaching, but you do have to have a bachelor's.


You might have to take a test or multiple tests to be eligible to sub in your area. Here in California, most districts require you to have taken the CBEST – the California Basic Educational Skills Test. This test shouldn't be too challenging, but I think it's always a good idea to skim through a prep book, even if it just means chilling at your local Barnes and Noble for an hour and flipping through.


Next, in CA, you need to have either a teaching credential or what's called an emergency credential. Teaching credential programs are available through all sorts of different colleges and universities, and they usually last a year or two. If you're just looking to test the waters and see if teaching is for you, getting an emergency credential and subbing for a short while can be a good jumping off point.


Find Jobs – Next you need to find substitute teaching jobs in your area. The first place I would suggest looking, as I suggested earlier, is the district's website. Different districts have different ways to apply, and the best place to get this info is straight from the horse's mouth. Another great place to check is EdJoin.org. On EdJoin, you can search all sorts of teaching jobs. Some key words are substitute or guest teacher. A lot of my local districts are referring to subs as “guest teachers” which I think makes it sound a little more friendly, so if you get stuck looking for “substitute” jobs, make sure to search for “guest teacher” positions as well.


Once you've met all the requirements and applied, you're all ready to go! Your district/school will notify you if you've gotten the sub job (my local districts don't require an interview or sample lesson for subbing) and will give you more information about how to check for jobs and whatnot. You'll get to do some exciting paperwork like W4s, read through a few handbooks, and depending on the district, sit through a substitute teacher orientation. These will help familiarize you with the school district and the sub management system and give you a chance to ask any questions you may have.


Good luck on the job hunt! Stay tuned for posts on what it takes to be an excellent sub!

Welcome to Teach with Tenacity!

Hey all! My name is Rose and I am currently a substitute teacher on the hunt for a classroom to call my own. I have been substitute teaching for a year now, and I have learned A LOT. I would love to share my experiences with all of you!

Thanks for reading! Keep your eyes peeled for upcoming posts!